Check it

My photo
Florida flat-lander refitting an Alberg 30, hull #329, for an eventual circumnavigation of the globe and the journey of a lifetime before I get too old!

Thursday, March 29, 2012

I got sole!


My last post is a study in indecision, procrastination and denial on a subliminal level. When I started writing it, I felt so smart and knew exactly what to do next.  As I typed, my confidence in the course I was about to embark upon dwindled. The main reason for this is that I was ignoring a problem that I walk all over every time I step down into the boat. The sole! The "floor" for you non-sailboat lingo exposed landlubbers.

Actually the sole is fine. It is what lurks underneath the sole that is the ugly problem. There are several bilge compartments down there that have very questionable bottoms. These bottoms act as a shelf of sorts holding items stored within up and off of the keel providing a space for accumulated moisture a path to the bilge. The things I need to keep in the two aft compartments are my future, very heavy house batteries.

In the current configuration, these compartments are not vertically big enough to hold the batteries I have chosen (4x Trojan T-125 6 volt). So, even if they were not approaching being rotten, I would still have to "replace" the bottoms of them to fit the batteries with room to maintain them.

When I was writing my previous post, I realized that my next logical step was refitting these compartments and I became instantly depressed and quickly closed with what I now know to be false directions I was heading in. I have already done work on the boat that is grosser, harder and less heroic. I dread this task because I will be dealing my ability to walk in the boat a serious blow. Without the sole in place while I am doing this work, it will be very difficult to walk or even crawl in the boat. Not to mention climbing down the gangway since it will not have a floor for support. This is going to suck!

On the bright side though, when I am done with this, the boat will be that much closer to being a picture of forethought and skillful execution! I am not looking forward to the task but I do anticipate a great feeling of satisfaction when it is done and I can move on towards the next exercise. The greatest satisfaction will come when I am sailing and have to check these compartments for some reason only to find they are not the problem!

My three day weekend is now planned! Oh joy!

Saturday, March 3, 2012

The path forward


I wish I could say that my path forward is as beautiful as what is depicted above. The  photo is misleading in a number of ways when put in contrast to my little endeavor. First, there should be weeds. Weeds would represent the things that I have questions about. I am a novice boat restorer after all and learning as I go. Second, there should be demons who would represent my paying job that keeps me from doing the boaty things that I need and want to do. I hope my manager does not read my blog! Third, the "light at the end" is far too close. I have a virtual world of shit to do and I know it.

Regardless of the above, I have chosen this picture as the "in my face" graphic motivational tool. It is now taped to my bathroom mirror. It is my desktop background on my work and home computers. It is taped to my windshield!  As I have said before, I do not do winter very well and I need this kind of thing to make me go outside when it is cold! Actually, this picture is a very good tool for me. I know what I need to do (clear path), I should keep focused (path is bounded) and there is a goal (the bright sunlight at the end).

Talking about this picture is not the reason I got online to update my blog. Outlining my immediate path forward is/was however. So, without further ado!

Critical path: (things that need to get done before the new engine goes in)

Um.......I need to really think about this further. I wrote a bunch of stuff but it was not long before I realized that more thought is in order. I can say this though, I need to replace through hulls and install the fuel tank. Both of those seemingly simple tasks open cans of worms as big as Barry!

I shall return with the answers!

Saturday, February 25, 2012

Kilo Kilo Four Golf Golf Foxtrot

What does it mean?!?!?!?!? Kilo Kilo Four Golf Golf Foxtrot = KK4GGF = my kinda new HAM call sign! I passed the HAM tech and general exams back in January. January 21st to be exact. I am now a delicious HAM people!

I studied about two months for the tech exam using a number of different tools, gimmicks and printed study guides. I studied about two hours for the general exam, that morning, using only the exam pool questions that have the correct answers highlighted. When I passed the tech I was asked if I want to take the general. Feeling cocky, I accepted and just barely passed. I passed though and I am amazed at my ability to take highly technical tests on subjects I know virtually nothing about!

With my current HAM license status, I can do everything that I need to do and intend to do aboard. For those that do not know what sailors use HAM and HF (high frequency) radio for, here is a list of some uses:

° Receive graphic weather files via SSB like this:


° Receive text format weather forecasts via SSB like this:


° Send and receive very short, text based email via SSB using WINLINK. Those that give a sh*t about me will love this. I can also update my Facebook page using this wonderful technology!

° Participate in marine radio networks while in transit. Radio nets are scheduled events which are used by sailors to check in, report positions, give/receive weather reports and camaraderie with other sailors/boats while in a specific area or crossing a specific body of water.

° Safety. All of the above are based upon safety while on the high seas. Chances are that if I need a rescue, HAM, SSB or HF are not going to save me but there is a small chance. Hopefully the gribs, forecasts and my own common sense will keep me out of harm's way.

Passing two tests does not make me an expert. It is for that reason I plan on taking a third and final exam; the extra! That is what it is called...The Extra Element Four. The BIG KAHUNA! I am going to take this exam in April and it will be a test. I actually took this exam the same day I took the others but failed. It was a hail Mary attempt (25 of 50=50%=fail) but I now know what to expect. While studying for this I will learn a lot which may help me and others in the future. I might end up being the radio guru in some harbors! That could be a curse actually....

I forgot to mention that internet is not available in the middle of the ocean and 90% of the places i plan to be. This is why yo.....

/73

Tuesday, January 17, 2012

Winter is my bane!

Have you ever seen the goats that fall over when startled? That is me when I walk out into cold weather.


Needless to say, if that is true, I am badly bruised from hitting the ground daily here of late. Why do people live in the North? I am only here because of my rather lucrative job situation. I suppose it is the same for everyone else because I really can not come up with any other reason to be here. Look at my poor boat....sad.

If you look closely in the picture, you sailboat people might notice that there is no companionway hatch. That is because the storm that blew in with all of the snow also blew off the hatch. Someone forgot to secure it and it is now in five or six pieces on my porch. I managed to build a temporary replacement yesterday but not before several inches of snow got in. I guess a new hatch is now a higher priority than it was before :)

Procurement Report:
I have excelled in this area lately! [pats own back]

The new Beta16 diesel is on the way. I actually paid for this months ago but held off on having it shipped due to storage limitations. Spring is around the corner and the new mounting beds and stern tube will be going in first. The motor will follow almost immediately!

I have purchased and received all of the parts for the new fuel system. This includes a new Moeller 27gal fuel tankRacor fuel/water separator and all of the hoses, clamps, return kit and fittings needed for the install. The new tank will be in the starboard cockpit locker where the old 18gal tank was. It is going to sit up kinda high on a stringer, against the hull and be about 3 inches below the deck. This will have some adverse affects on sailing performance but I hope to install the old tank on the opposite side to help even things out. With the tanks up in this space you would never even know they are there. They are completely out of the way which keeps the lockers open for even more heavy crap which will further degrade performance!

I also sprung for and received a new Airhead Composting Toilet. I did a lot of research on this type of head and decided on the Airhead because of the evolution of the product and owner reviews. This model has been steadily improved upon until now and is just better than the rest! Should I test it out and post pics of the results? It is going in the bow, under a removable board that I will crawl across to get to the chain locker.

I also bought 50 feet of good quality 1/2" bungee cord to make chain snubbers and line snubbers with. Once I perfect my design I will post some pics.

I am currently trying to decide upon refrigeration. None, yes and if yes what model. I have narrowed my search down to either this Engel MB40 drop in unit or this Waeco SuperColdMachine coupled with this Evaporator. The Engel would be an easier than normal install but these units are new to the market and therefore untested among the cruiser community. When I talked to Engel I asked for more information which they sent. It was written in Japanese and I don't feel like being a guinea pig. Engel is known for great portable refrigeration though. I will make a decision in the next few days.

Next up, weather and time permitting, is removing the existing water tank structure that is built into the cabinetry in the bow. I fully expect to see a great deal of nasty, gross mildew in there. Fun fun fun :)

Thursday, December 29, 2011

Surveyor to the rescue!

Last post October 16? Really? It has been cold, that is my excuse.

Back in November, right before the weather changed I actually did some work on the boat. I had removed the two winches and all of the other hardware from the cabin top. I then reamed, beveled and filled all of the fastener holes with thickened epoxy. I took a ton of pictures documenting my superb craftsmanship and planned to post all of this information to the blog but the SD card in my phone (camera) died before I could get them downloaded. So, you readers will have to take my word for it.

This past Christmas day, I took a few hours to measure (survey!) for a new piece of kit that I intend on installing. The Cape Horn Windvane is a state of the art mechanism that will steer the mighty Cookie when at sea allowing me to enjoy the ride. No serious ocean voyager goes to sea without some sort of self steering unless they are just masochistic. A sailor can not sit at the tiller 24/7 and it is the windvane that allows for time to sleep, cook and fart around below. Most sailors love their windvane so much that they even give them names. Mine might be Milk. Cookie and Milk, get it? Give me some ideas guys!

Being a surveyor I took the measuring (surveying!) for my windvane very seriously. The first thing I had to do was to level the boat. I did this by placing a long carpenter's bubble level on the cabin sole and cranking the trailer tongue up or down until level. I climbed up, down, in and out of the boat several times to get it just right. Do not worry though, three beers later I had it perfect! I double checked it on the outside by using a clear hose filled with water to verify the bottom of the keel matched the sole which it did.

I next had to remove the mainsheet traveler and taffrail both of which were in the way of my measuring (surveying!). The taffrail is in pretty bad shape and came off easily after removing a few remaining bungs and 10 screws. The mainsheet traveler was another story. It was difficult to remove due to the fact that I only have two hands. I managed to remove the ten paint encrusted bolts that I could only feel and not see after much cursing and some bruising caused by leaning down into the hatch to reach them. I discovered some structural damage when I removed the traveler which will need to be repaired. The backing block has been pulled up during violent gybes apparently. This has caused some deck damage at the ends of the traveler.

Pic of the mainsheet traveler and the taffrail which is falling apart:


I was pleasantly surprised to find that the tops of the lazarette hatch edges are parallel with the cabin sole! This seemingly simple fact makes this measuring (surveying!) exercise much easier. I can lay my measuring stick down on those edges and go to town!


First I measured out where the vane will mount in the cockpit; Centered and 9" up from the cockpit floor. I then drilled a very small hole and inserted a string:


I then lined up the end of the measuring (surveying!) stick so that it was perfectly vertical above where the vane will enter the cockpit. As it turns out this bulkhead is not true vertically, it leans aft about a 1/4" as you can see here. I used a level to get it right:


I then attached the string inside the lazarette to the chainplate knee making sure it is also level:


Now I am ready to measure (survey!) I made a mark on the string at 18" from the fore end of the measuring stick (my survey baseline!) using a plumb bob. From that mark and the string I could measure everything I needed inside the lazarette. I then moved the plumb bob outside to the aft end of the measuring stick so that I could measure (survey!) the stern and water line.

Plumb bob at 18" to mark the string:


The aft end of the baseline. I had already removed the plumb bob but never fear, I did it right with a level and everything, even to the water line!


Using the baseline and my measurements from inside, I marked where the vane will exit the transom, although it is really hard to see in this picture. I went back later and used a permanent marker;


And my survey field notes:


I then input the measurements in Autocad and produced a drawing annotated in metric units for the Canadian manufacturer:


I sent the above drawing to Yves, the owner of Cape Horn Windvanes and ordered mine! I am pretty proud of the job I did since I know how accurate it is.

Next on my plate will be to mock up a fuel tank using cardboard so that I can get that ordered and in place before I put the new engine in this spring.

Happy New Year!
Sunday, October 16, 2011

Glass virgin no more!

Saturday started with some research and planning in preparation for fiberglass repairs of the three big holes in aft cabin trunk. Having owned boats nearly all of my life, I never once had to do any fiberglass repairs on any of them. Once many many years ago I helped my brother-in-law add some glass to his catfish boat to beef it up. Up to this point that is my only experience with it. I always keep my boats off of the rocks :)

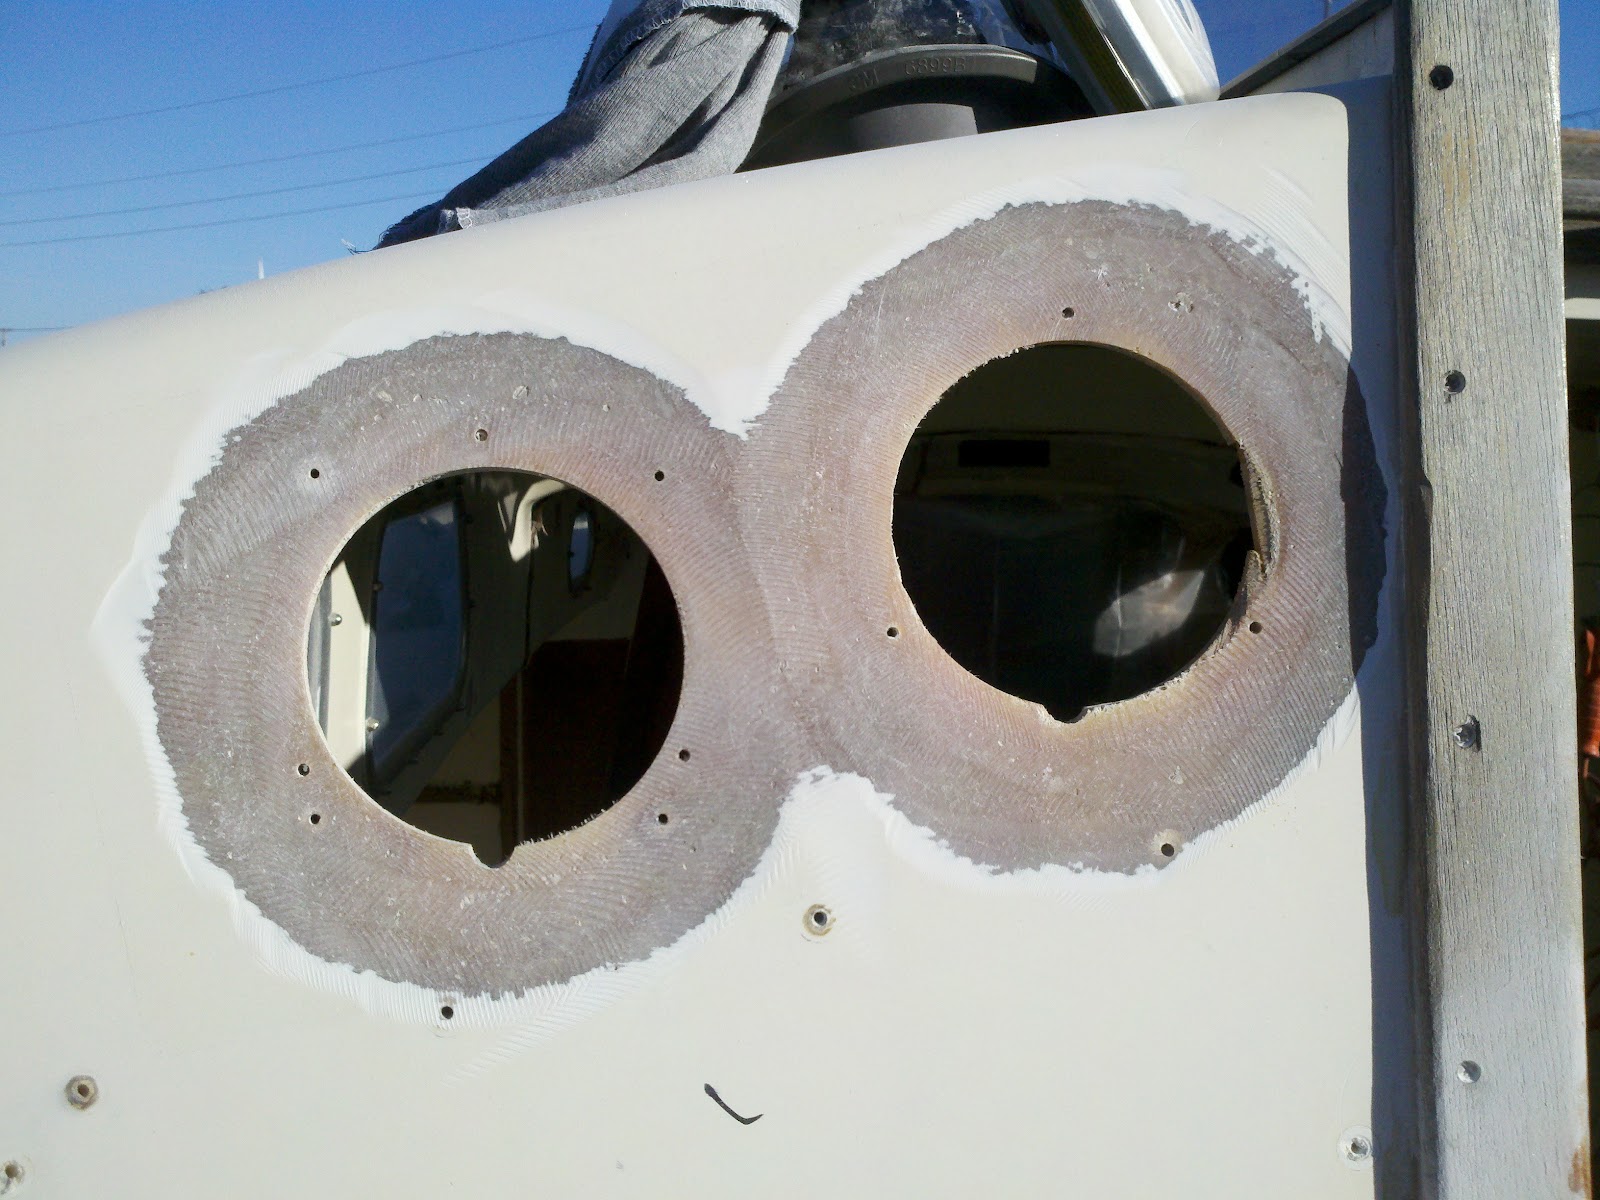
When I asked a few questions on my favorite sailing forum I was rewarded with the knowledge of some of the best in the business! With the information I needed I was prepared to get busy but not until I drank a few beers and waste a couple of hours. Once my courage was at a sufficient level, I grabbed my grinder, loaded a 50 grit disk and did something I have never done before. I ground a bevel around the holes that would accept the repair glass. See!

"The Book" says that the bevel should be 12 to 1. Because of the adjacent trim and the curve that transitions to the roof, I had to reduce the bevel to about 9 to 1. I think it will be ok. The wind was really howling which carried away 95% of the dust so there was not much to clean up for a change.

This morning, while waiting for the weather to warm up, I cut the cloth (17oz mat backed biax) and balsa core plugs I would need. This was fun.

After a bit the thermometer read 60° which meant it is time to get ready. So I loaded up my little wagon with all of the stuff I was going to need and headed out to the boat. Do not laugh at my wagon! It has saved me and my back a lot of trouble. My mom painted blue. I would prefer red but out of respect for her it stays this gross shade of blue.

Ok, here is where it starts to get ugly. I remind you that I have never done this before so please be gentle! I started on the inside by wetting out the surfaces with neat epoxy including the exposed core. I then wet out the glass rounds and placed them over the hole. Then I wet out one side of the core plugs and placed them in the holes from the outside and pressed these together with my hands.

Because I was having trouble with runs I mixed my next batch of epoxy with some fillers. I used a 2 to 1 mix of 404 and 407 to a almost ketchup consistency. This might have been a mistake because it was almost too thick and I still had trouble with sag. In the following pictures you can see how ugly it turned out. Mostly because I had to continually push the round glass up when it would slowly slide down. Doing this several times on each one made it look sloppy.

The inside looks better but I made a boo boo in there by applying some of the thickened epoxy to one of the patches. That was not a good idea because it was getting too tacky to spread. You should be able to tell which one it is. I finished by giving everything a thin coat of neat epoxy.

So there it is! Not perfect but not too bad considering I have no experience with this type of work. I will pay for my mistakes later when I have to sand and fair these in. I found it interesting just how much filler it takes to thicken epoxy. Good thing it is cheap compared to the resin. I am proud of myself for not getting any all over me and none in my hair!


Thiokol - Satan's caulking

Friday was spent removing the stern tube and the thiokol that had a titan's grip on it. Thiokol is a grey, hard yet rubbery substance that is also sticky kinda. It is unlike anything I have ever worked with and I hope this is the last time I ever do.

I started by putting a socket wrench on the one remaining bolt holding the stern tube to the deadwood. With about two pounds of pressure the very top portion of the head of the bolt disintegrated. Out comes the Dremel Tool to cut off the bolt which went smoothly but not the way I wanted it to do this. Once it was ground down and looked like the other broken bolt I tried to pry the stern tube out of its hole. I could get it to move about a 1/4" and when I let it go it would snap back in as if it were held in by something rubbery. I knew then that I was going to have to remove the rubbery devil's caulk.

I spent the rest of the day, about five hours, laying on my stomach on this board scraping, cutting and cursing.

This is the point at which I was able to pull the stern tube out. Four inches of thiokol removed.

And the stern tube. You can see that is had a black rubber gasket around it aft end which reacted with the thiokol. It also had a large amount of what I think was burnt oil which I found to surprising.

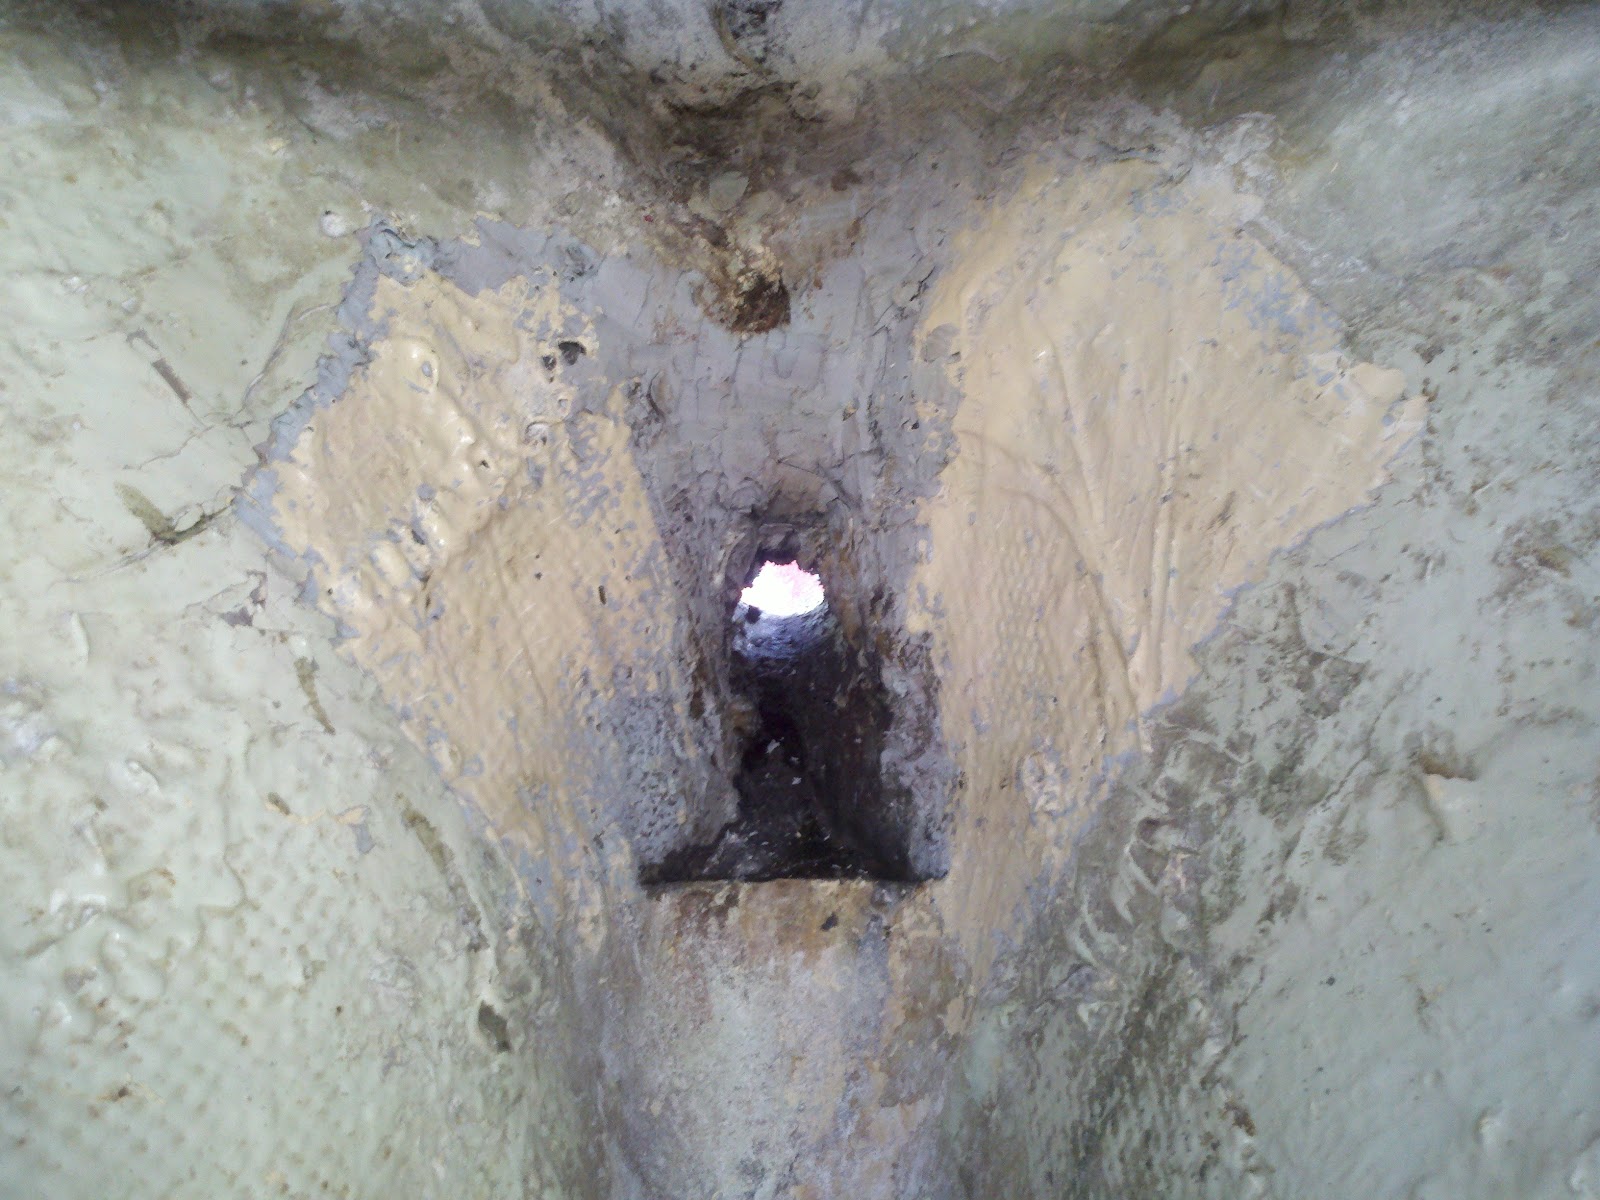
With the tube out I returned to my oh so comfortable board to remove the rest of the thiokol. After a couple of hours fighting this stuff I decided to just take out what I needed to in order to make future stern tube repairs. It is not a perfect job but by this time my hands were killing me. I may finish talking the rest out later but this is what it looks like now.

I have all winter so maybe I will find a reason to punish myself and get back in there and get the rest out.