Check it

My photo
Florida flat-lander refitting an Alberg 30, hull #329, for an eventual circumnavigation of the globe and the journey of a lifetime before I get too old!

Saturday, June 30, 2012

105° Scaffolds

It was 105° yesterday and I needed something to do that could be done in the shade. So, I built these two scaffolds!


They even stack! They stand 5'8" tall and are kinda heavy but very stout. I am going to thru-bolt the legs to beam joint this morning for a little added security. They will also get a coat of Thompson's Wood Sealer.

I dragged them out of the shade and next to the boat for this shot. 8pm-ish.


I have two PT 2"x8"x10's as planks. I am going to attach a 2"x4"x8' and an end stopper to the bottom of each plank to stiffen them up and keep them from sliding off the scaffolds. Job not quite done but close enough to blog about it and pump my chest!

I tried to do some recore work on the side decks using the ladder and kneeling. That proved way to dangerous so making these was the next logical step.

Forecast is 102° today with rain tonight and tomorrow :(

Fair winds...._/)

Thursday, June 21, 2012

Fore Deck Repairs

I patched the three holes in the fore deck last weekend and I learned a few things too!

1. Grinding the bottom surface, upside down in the bow is hard.
2. Only one tool will properly grind fiberglass when upside down: a grinder.
3. Make measurements and mark the limits of the planned grind beforehand so that the cloth patches can be premade thus saving time and daylight.
4. Mixing epoxy and performing the actual patching in the dark is not the preferred method.
5. Plan ahead. Run to the store to buy supplies at night or prior to starting the work, not during the work.
6. Make cardboard templates to mark and cut common sized, round cloth that will be used over and over.
7. Use fast hardener for tack coats of epoxy if you have it. 
8. Learn from mistakes!

OK! I think that anyone who reads the above can imagine how it all went down. The patches are good and solid but it just took a very long time. So, without getting in to a drawn out, embarrassing narrative I will post some pictures in the hope of saving face!

Three holes ground/beveled. Same on the under side. By the way, the core is all good on the fore deck including around these holes. By my toe you can see where the cleats were mounted over the bulkhead below. The core is slightly compressed in that area but not rotten.


Earlier in the week I received this pair of awesome scissors in the mail. What a difference they make when cutting fiberglass cloth. Money well spent.


I used all kinds of things around the house to mark the circular cloth plugs for cutting. Plastic paint pots, an epoxy filler canister, a dixie cup, the bottom piece of a terracotta garlic roaster and this bottle of chimichurri...


Cutting these out took a lot longer than it should have...


because I was day dreaming and taking pictures of trees with my new camera :)


It is at this point that I had to go buy sand to make these sand bags. In Florida sand is white and all one has to do to get it is dig a hole. The sand that I bought is labeled "play sand", is better than the clay one would dig up here in Kentucky and is pinkish! The bags I made are double bagged and are sealed with Gorilla Tape and staples. I am so proud of them!


Running out of light here. I applied a tack coat of epoxy before placing these ...


and this one. I did not use fast hardener which I have. Big mistake!


It got dark waiting for the underside patches to stiffen up enough to set the topside patches. The forecast for the following day was rain so I needed to get it did. But here I sit taking pictures, waiting for the slow hardener to harden slowly. That is my back porch boat yard glowing behind the building center pic.


At this point I put the camera away and gathered everything I needed on the bow to finish this task in the dark. It was after midnight when I was done and everything put away again. The headlight meant for night time ocean sailing really came in handy for this land locked, frenzied, nocturnal epoxy slingin!

I was sore the next morning. Anyone who has done this kind of work knows what is involved, Carrying stuff up, forward, back, down blah blah blah....

The rain passed just north of where I am, lasted all day and caused flooding conditions. I was lucky. Here are the fruits of my labor from the night before:

My beautiful sand bags over the patches...


and the patches themselves!


No dry cloth for a change! Actually I used a little too much epoxy and it seeped around the edges. No problem though, I am going to grind/sand the gelcoat anti-skid pattern off. I could have used a fourth layer of cloth on the two holes right side. They are very solid though.

I had envisioned getting twice or three times the amount of work done over the weekend than I actually did. I will take what did get done and try to plan better so that I am not left waiting or wasting precious time in the future. I have three full days off this weekend but my expectations are to just do a good job, not a fast job.

Fair winds..._/)
Thursday, June 14, 2012

Playing with boogers! Part One

BOOGERS! If you are going to follow my blog, you have to have a strong stomach and the attention span of a terracotta Chinese warrior! My posts are few and sometimes they contain references to things that we all live with but never mention.

Last weekend was not the leap in productivity that I had suggested it would be. Friday was spent goofing off on the interwebs ordering expensive hardware and checking out other peoples boat restoration blogs. Saturday was my birthday. Sunday was a day spent in the shower washing off the shame and regret left over from Saturday. In other words, I took the weekend off from boat work!

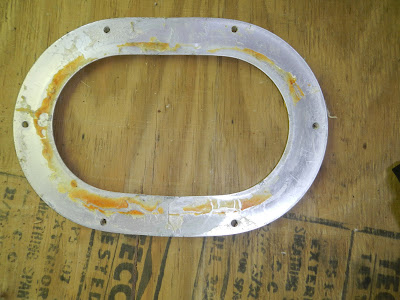
Feeling totally guilty, I hit it hard beginning Monday by trying to clean the deadlight frames. Through some experimentation I found that relying solely on the Magic Goo to remove the silicone was not the way to go. Blindly spreading the goo on a frame makes a huge mess but it also does something else more insidious. Where the silicone is thin, the goo makes the silicone very hard to remove. Where the silicone is thick, the goo renders it so soft that it can be scraped with an epoxy stirrer. Very strange behavior.

So, after two frames of this, I resorted to "rolling" the thin silicone off with my thumbs and leaving the thick, tough silicone for the goo. Rolling industrial silicone boogers off of aluminum boat window frames on which they have been adhered for forty plus years is hard work. After repeating this procedure on the remaining six small frames, over the next few days, I can claim the toughest thumb calluses and strongest grip ever earned in such a short time! Cred goes out to "hot soapy water" and "3M pads"! Without them I could not have done it!

Check it out. Eight clean small frames!


Now the BIG frames! I am ready. Bigger silicone boogers = bigger rewards!

If you read this far, I commend you. Hopefully you will not have to endure any more sophomoric blog posts until you read  "Playing with boogers! Part Two"!

This weekend: The deck repairs I promised myself last weekend.

Friday, June 8, 2012

Magic Goo!

This past week I received something in the mail that might have been sent from heaven! It is called Mckanica Silicone Remover and it will be worth its weight in gold if it works as advertised.


I did a test on a small area of one of the frames. You might be able to see an area of silicone on the right that is darker than the rest. That is my test area where I applied some of the magic goo.


I let it sit overnight although the directions say 2 to 3 hours. Hey, the Heat game was on, ok? This morning I checked it and IT WORKED! The silicone from hell peeled right off like it was not supposed to be there, which in my mind, it wasnt. You can see the now clean area on the right.


Hallelujah! Although I will have to sit and dab it on with a small brush or something, it sure beats the alternative. The alternative is destructive grinding with an abrasive and quite honestly that might not even do the trick.

In other news, I removed the old 1" cockpit drains. Once again, the bolts were ridiculously longer than they needed to be. They could have used a 1" long bolt but noooooo they used 2-1/2" long. They were bronze for a change but heavily corroded. Since I am working alone and my patience is thin, I backed the nuts off (small visegrips tied to a string on the nut and me in the cockpit with a screw driver) far enough to bend and break the bolts. Not text book procedure but it is my boat!


I will be replacing them with these babies.


Those are 2" Marelon cockpit drains. The strainers are 4" nickel floor drains. Installing these will require some ingenuity but I think I have a good method in mind. Something that was suggested by an old pro in one of the boat forums I frequent. More on that later.

This weekend I begin re coring the decks and also some hole repairs. The weather forecast is perfect, I have three full days and plenty of beer so lets see how far I can get!

Saturday, June 2, 2012

Deadlight Struggle

The past few days has been rainy and frustrating. I did manage to get a little more demolition in though! Nothing can stop me from being destructive.

Last week I removed the Goiot hatch lid over the saloon and sent it off to Select Plastics to have a new lens and new gasket installed. So now it is time to remove the base and the teak ring. While I am at it, I decided to remove the deadlights too. After all, how hard could it be!

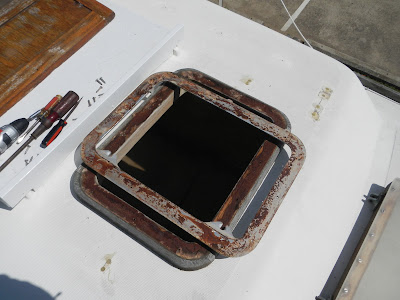
Base removed. Sealant is chalky.


Teak ring. This is going to be tough to get off. Save for later! :P


There was no way for water to escape this box....


Feeling froggy, I attacked the deadlights. This is going to be easy, just remove the bolts and the frames and lens will simply fall in my lap!

Bolts out port side...


and in the bow....


starboard bow....


and finally starboard saloon.


I was certain this was going to be easy. Boy was I in for a big surprise. These deadlights are, or were, held in not by bolts but rather by the super duper silicone from hell that sealed them. I had no idea...

After messing around with a screw driver trying to gently pry the first frame off, it became apparent that I was going to need a beer...and another tool. I resorted to a metal putty knife which worked better once I found a point of weakness between the frame and the cabinside. Within seconds I knew this was going to much harder than I ever thought it would be.

First frame off after 45 minutes of CHISELING!


Close up of the silicone...


Three frames off in two hours. There has to be a better way!


By now the poor putty knife that I was using to chisel with gave up the ghost. I am glad because when I bought two new ones and used one I found something out. It is much easier if the tool is sharp! Duh...

So the next day I went back at it. It was still difficult to remove these things but mostly because I was trying to be very careful not to bend the frames. The exterior frames on the starboard side were much easier than the rest due to the fact they were exposed to direct sunlight and the silicone was softer. They were the last ones that I did and by then I needed a little break like that.

16 frames, 8 lens and 9 beers later...


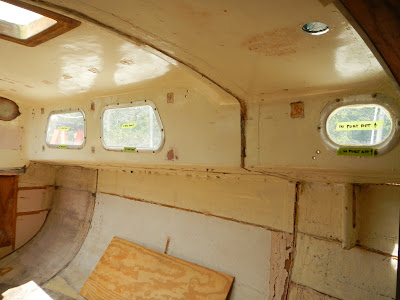
Look Ma! No windows!


and of course within an hour it starts to rain....


Little did I know then but my phone was still in the boat. I only realized it after the deluge was coming down by the bucket.

I ordered two tubes of silicone caulk remover gel to get the crap off of the frames. I hope and pray it works! Stay tuned!