Last week I had some spare time and I intended to use it by beginning my re-coring project. There were some spots that I knew needed re-cored and others I was not sure about. Every hole was suspect and there were a lot of holes.
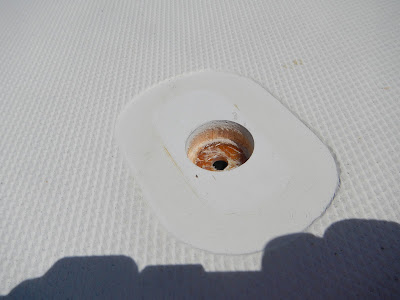
I started on the hole where the old sewage system suction vent passed through the port decks. I knew this area was bad. I started by drilling holes through the top skin and inspecting the core beneath. By doing this I could determine extent of rot and mark it for removal.
I made the cuts using a 4-1/2" Kobalt diamond blade on a grinder. The outer cut is 3-1/2" from the toe rail which leaves a 1/2" lip over the core. The outer or left edge of the hole pictured above is the hull to deck joint.
I wanted to keep the patches square or rectangular in order to keep it simple. I had to sacrifice good solid core to do this though. Some rot and some good solid core:
Not as bad as I thought it would be. I scraped out the old core, cleaned it up and sanded the bottom skin down to a good surface. I also used a dremel to remove the core around the edges about a 1/4".
And then grinded away the surrounding gelcoat and beveled the bonding area.
Cut the new core and cloth...
And made the repair!
My very first re-core! I was threatened by rain the whole time. Once the old core was exposed, the clouds showed up and it was raining all around but not right where I was thank goodness. I was worried about it though, trust me. Eh, I forgot to mention that before making this patch, I filled the edges where I removed old core with thickened epoxy.
From there I moved to the port side genoa track. This is a series of six holes through which the track mounts. It was highly suspect in my mind. I didnt want to muck up the entire area though so I started by inspecting the core at each hole. I used a 1-1/4" carbide grit hole saw and sawed out each hole.
Much to my surprise there was not rot! I sounded out board of these holes and it seemed solid.
So, I cleaned up the holes and removed a 1/4" of surrounding core using these dremel bits:
These things made the job easy...kinda. I could not imagine having to use a bent nail in a drill for this. Here they are ready to fill:
I decided at this point to visit every hole on the fore and side decks in this manner. What a blessing I was faced with when I was done! No rot at any of them! 38 holes and all were bright yellow core as if it were installed yesterday!
I now had 38 1" and 1-1/4" holes to clean up, remove surrounding core, acetone wipe and fill with epoxy. The inner perfectionist in me would not allow a shoddy job so this took some time.
Here is an example of a hole ready for epoxy. It is hard to see but the core is recessed 1/8" all around
Through some experimentation I determined that I needed a pour-able epoxy mixture. The mixture I chose was a one using milled glass rather than cabosil. For each two "pumps" of West Systems epoxy I added one heaping tablespoon full of System 3 milled glass. This made a very strong plug that would not break and could be poured.
Now how to pour it!?!? I have not had very good luck with big syringes so I came up with a good solution that made this easy too. I took a 16oz plastic dixie cup and made a small hole right at it's bottom but on it's side. I could then pour a few ounces of the milled glass epoxy in the cup, return my pot of epoxy to the bucket of cool water and work with the cup. By tipping the cup towards the hole I could control the rate of flow and fill my patch with no mess. Genius!
I filled all 38 holes this way without spilling any which was amazing. I am used to epoxy everywhere! After the filled holes tacked up a bit I had to go back and finish filling them with thickened epoxy because they were all on a slope like this:
You can see the high side (left) where the thickened epoxy is much more opaque.
The fore deck done!
Starboard coach roof:
And port:
Not having to totally re-core these areas is a real blessing. This saves me weeks of hard work. I do have areas that I know will need to be done but man, I feel lucky.
The decks along the cockpit, the aft deck and the cockpit floor will all need extensive re-coring so my joy will only last until this coming weekend!
Fair winds...._/)


Nice work!
ReplyDeleteThat's great news. My A30's deck is cored with masonite. I've heard it's more difficult to damage than balsa. In the few spots where I've exposed the core, I'm amazed at how thin it is. The layup is mostly fiberglass.
ReplyDeleteNice trick with the dixie cup! I'm always making messes when I have to pour epoxy.
ReplyDeleteThanks! I used the new square bottom cups and cut a sliver from one of the corners with scissors then widened it slightly. A cup designed for this purpose and made from the right material just might be the ticket to financial independence!
Delete